John Deere A Tractor Wiring Diagram: Your Guide to Electrical System Mastery
Understanding your John Deere Model A tractor's wiring diagram is crucial for maintaining this classic machine and appreciating its historical impact on agriculture. This guide will walk you through decoding the diagram and troubleshooting common electrical issues, all within the context of sustainable farming practices. This classic machine represents a significant turning point in agricultural technology, and understanding its electrical system allows us to better analyze its long-term effects. For additional troubleshooting tips, see this helpful resource: John Deere A Warnings.
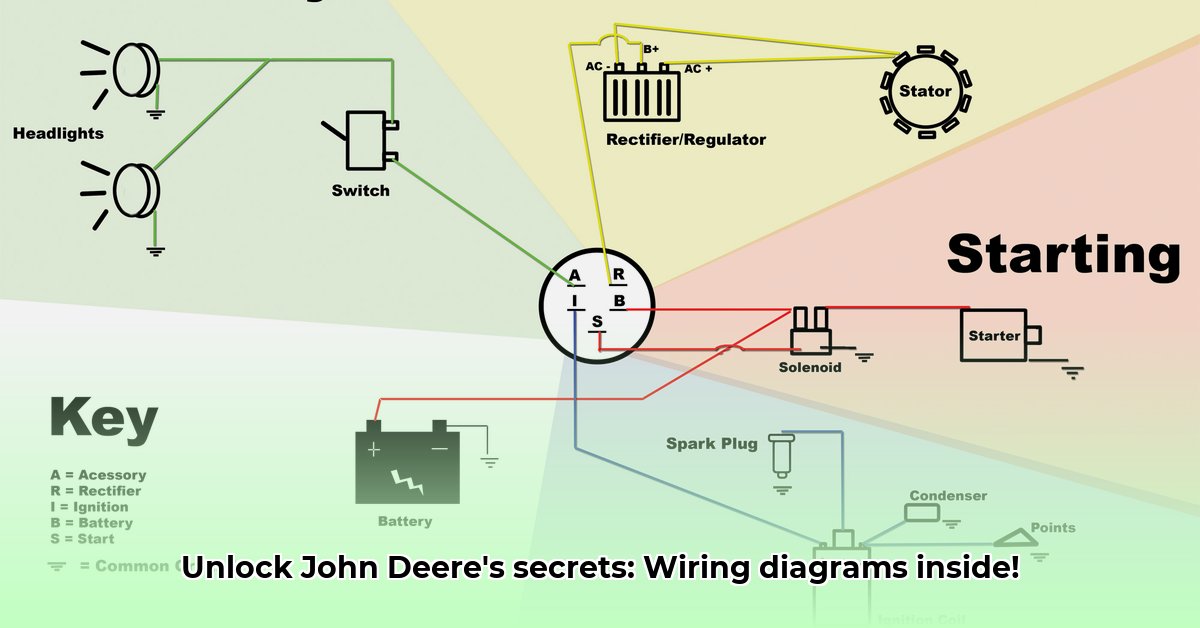
Decoding the John Deere A Tractor Wiring Diagram: A Step-by-Step Guide
First, locate your tractor's wiring diagram. It's likely in the owner's manual or available online through John Deere resources or enthusiast communities. While it might seem daunting initially, we’ll break down the process step-by-step.
Step 1: Familiarize Yourself with Symbols
Wiring diagrams use standardized symbols. A legend usually accompanies the diagram itself. Take time to learn what these symbols represent. For example, a circle often signifies a light, a squiggly line might represent a resistor, and straight lines indicate wires. Mastering these symbols is like learning a new language—crucial for understanding the diagram's information.
Step 2: Trace the Electrical Path
Imagine the electricity flowing through the circuits. Select a component, such as a headlight, and trace the wire back to its power source. Note any connection or branching points. This methodical approach will clarify the electricity's journey.
Step 3: Identify Components
Each electrical system component has a specific symbol on the diagram. Recognizing these symbols will greatly aid in identifying components and understanding their function within the overall system. The diagram often labels individual wires, making it even easier to analyze each element.
Step 4: Troubleshooting Common Problems
Is your tractor experiencing starting difficulties or dim lights? The wiring diagram is your primary troubleshooting tool. Follow the circuit pathways indicated on the diagram to identify the potential problem area. A common culprit might be a blown fuse, a faulty switch, or a loose connection. The diagram streamlines the process, leading to faster troubleshooting and more efficient repairs.
Step 5: Testing with a Multimeter (A digital device that measures voltage and electrical resistance)
Use a multimeter to check voltage and continuity to confirm your suspicions about a specific component. This verifies whether the electricity is flowing correctly through the circuit. Always disconnect the power before testing – safety is paramount. The multimeter is an indispensable tool for confirming your analysis.
Step 6: System-wide Understanding
Utilize the diagram to comprehend your John Deere A's complete electrical system. This extends beyond troubleshooting, allowing you to visualize the connections between various components like the lights, ignition, and starter. You may uncover surprising interconnections and relationships within the system.
Spotlight on the Lighting System
Let's examine the lighting system as an example. The wiring diagram will show electricity's journey from the battery, through a switch, and to the lights. If a headlight malfunctions, you would first check the bulb; then, trace the wire back to the switch, verifying each connection point with your multimeter. This methodical diagram-based approach minimizes frustration and maximizes efficiency.
The Model A's Impact: Efficiency and Sustainability – A Historical Perspective
The John Deere Model A revolutionized farming, significantly increasing efficiency. However, this efficiency came with long-term consequences. Increased reliance on petroleum-based fuels introduced environmental impacts that weren't fully understood at the time.
Comparison:
| Feature | John Deere Model A Tractor | Horse-Drawn Plow |
|---|---|---|
| Efficiency | Substantially Higher | Significantly Lower |
| Labor Requirements | Much Lower | Very High |
| Fuel Consumption | High (Petroleum-based) | None |
| Environmental Impact | Significant Emissions | Low direct emissions, localized manure management challenges |
| Land Use Impact | Enabled Cultivation of Larger Areas | Limited by labor and animal capabilities |
This table highlights the trade-offs inherent in the Model A's technological advancement. While it boosted productivity, it also increased environmental impact.
Maintaining Your Model A: A Modern Twist on Sustainable Farming
Restoring a John Deere Model A connects us to agricultural history. Understanding its wiring diagram keeps this history alive and functioning. However, we must acknowledge the Model A's environmental limitations. This understanding should inform our approach to modern sustainable agriculture.
Consider using alternative, sustainable fuels whenever feasible. Implement responsible land management practices that minimize soil compaction and promote soil health – issues that were not fully understood at the time of the Model A’s introduction but are critical in modern sustainable farming. The Model A’s efficiency should serve as a benchmark for modern improvements, striving to match its productivity while minimizing its environmental footprint. The wiring diagram is the first step in mastering this classic machine and its place within the broader context of sustainable agriculture.
How Did John Deere Model A Tractor Impact Early 20th Century Farming Sustainability?
Key Takeaways:
- The John Deere Model A significantly increased agricultural efficiency, although not designed with modern sustainability in mind.
- Mechanization reduced labor needs, potentially decreasing land use per unit of output.
- The Model A's dependence on gasoline increased fuel consumption and raised environmental concerns.
- Maintaining the Model A’s electrical system maximizes its lifespan and minimizes waste, contributing to sustainability.
- The Model A’s impact underscores the complex interplay between technological progress and environmental repercussions in agriculture.